iBSS and iBEC Explained: Apple’s Temporary Restore Bootloaders
If you work with iPhones at a low level—whether for repair, forensics, jailbreak research, or exploit development—you will constantly encounter two important boot components:
- iBSS
- iBEC
These are not full operating systems.
They are temporary bootloaders used during the restore process.
Think of them as bridge stages between BootROM and iBoot.
Without understanding them, you cannot fully understand:
- DFU restores
- Recovery restores
- Ramdisk booting
- checkm8 workflows
- NAND diagnostics
- Custom restore pipelines
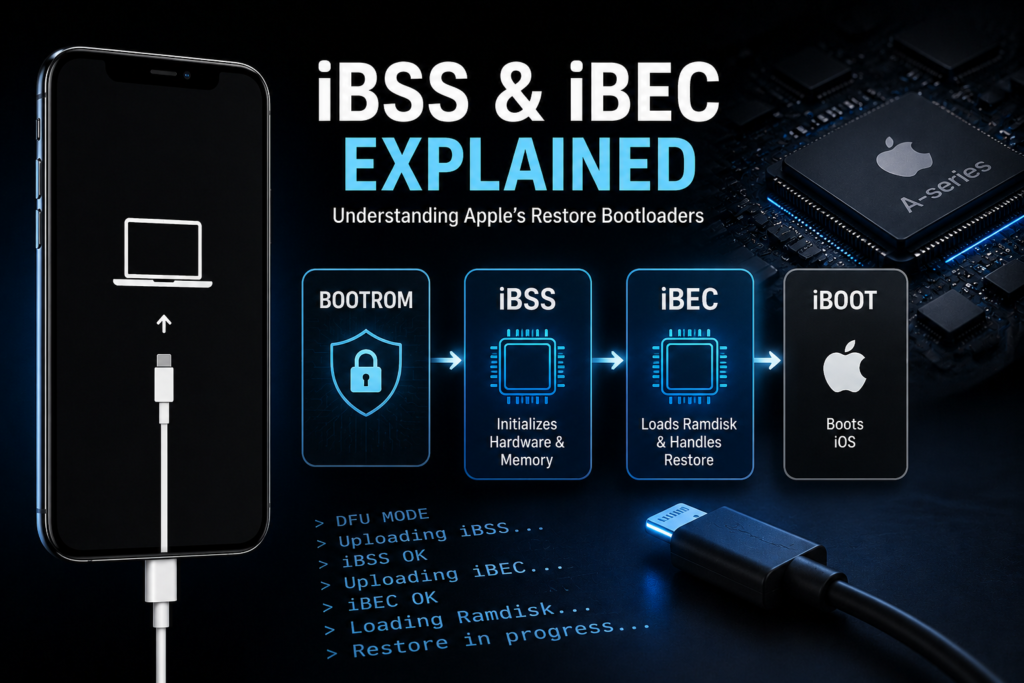
Where iBSS and iBEC Sit in the Boot Chain
The simplified Apple boot sequence:
BootROM → LLB → iBSS → iBEC → iBoot → Kernel
On modern devices:
BootROM → iBSS → iBEC → iBoot → Kernel
Each stage verifies the next.
This creates Apple’s secure chain-of-trust.
Related:
Understanding Apple BootROM Security
What is iBSS?
iBSS stands for:
iBoot Single Stage
It is the first temporary restore bootloader loaded after BootROM.
Its job:
- Initialize basic hardware
- Set up memory
- Set up USB
- Prepare environment for iBEC
- Verify iBEC signature
It’s lightweight.
Minimal.
Purpose-built.
Think of it as a restore bootstrap.
What Loads iBSS?
Depends on mode.
In DFU Mode
BootROM receives iBSS over USB.
Host sends:
- signed iBSS image
BootROM verifies it.
Then executes it.
This is the first step of firmware restore.
In Recovery Mode
iBoot may re-enter restore flow and chain-load restore images.
Different path, same idea.
What Happens Inside iBSS?
Once running:
1. DRAM Initialization
BootROM may not fully initialize all memory.
iBSS finishes memory setup.
Critical for:
- large image loading
- ramdisks
- kernelcache staging
2. USB Reconfiguration
BootROM USB stack is minimal.
iBSS loads a more capable USB environment.
Enables:
- larger transfers
- restore images
- more commands
3. Signature Verification
iBSS verifies iBEC.
Apple maintains trust here.
Unsigned iBEC fails.
4. Hardware Setup
Initializes:
- clocks
- NAND interfaces
- PMU
- storage channels
This prepares for deeper restore.
What is iBEC?
iBEC stands for:
iBoot Epoch Change
It is the second temporary restore bootloader.
More advanced than iBSS.
Its responsibilities:
- restore orchestration
- ramdisk booting
- filesystem prep
- NAND flashing
- boot argument parsing
This is where things get interesting for technicians.
What Happens Inside iBEC?
1. Ramdisk Loading
iBEC loads:
- Restore Ramdisk
- Diagnostic Ramdisk
- Custom Ramdisk (exploit workflows)
This is crucial.
Ramdisk work starts here.
Related:
How Ramdisks Work in iPhone Diagnostics
2. NAND Access Initialization
iBEC prepares storage communication.
Needed for:
- erase
- write
- partitioning
- filesystem deployment
Important for NAND diagnostics.
3. Restore Control
iBEC manages:
- IPSW extraction flow
- firmware image placement
- partition writes
- boot object installation
This is the heart of restore.
4. Boot Arguments
Technicians often patch iBEC for:
- debug boot
- verbose mode
- custom args
- ssh ramdisk
Example:
rd=md0 -v serial=3
Used in forensic workflows.
Why iBEC Matters in checkm8
checkra1n and palera1n often patch iBEC.
Why?
Because iBEC controls:
- ramdisk loading
- custom boot args
- trust bypasses
- exploit staging
checkm8 gives BootROM execution.
But practical workflows often continue through patched iBEC.
BootROM → Exploit → Patched iBSS → Patched iBEC → PongoOS / Ramdisk
This is the real pipeline.
iBSS vs iBEC
iBSS
Purpose:
Bootstrap restore environment.
Main focus:
Hardware + iBEC launch.
Complexity:
Low.
iBEC
Purpose:
Full restore logic.
Main focus:
Ramdisks, NAND, restore pipeline.
Complexity:
High.
How Restore Works in Real Life
When Finder/iTunes restores:
Step 1
Device enters DFU.
BootROM waits.
USB PID:
0x1227
Step 2
Computer sends iBSS.
BootROM verifies.
Executes.
Step 3
iBSS loads.
Initializes memory.
Verifies iBEC.
Step 4
Computer sends iBEC.
iBSS verifies.
Executes.
Step 5
iBEC loads Restore Ramdisk.
Runs restore logic.
Flashes NAND.
Step 6
iBoot boots installed iOS.
Done.
Why Technicians Should Care
Understanding iBSS/iBEC helps in:
Boot Loop Diagnosis
Knowing where boot fails matters.
Restore Failures
Errors often happen during iBEC stage.
Ramdisk Diagnostics
Most diagnostic environments depend on iBEC.
NAND Recovery
Storage initialization often starts here.
Activation Analysis
Custom ramdisks rely on patched iBEC.
Exploit Research
Most post-checkm8 tooling depends here.
Common Technician Mistakes
Confusing iBSS with iBoot
They are separate.
Temporary vs permanent.
Assuming DFU directly flashes NAND
False.
DFU loads iBSS first.
Thinking iBEC is optional
Impossible.
Restore logic depends on it.
Practical Example
In a checkm8 workflow:
- Enter DFU
- Trigger BootROM exploit
- Upload patched iBSS
- Upload patched iBEC
- Boot SSH Ramdisk
- Access NAND
- Pull logs
- Analyze activation data
This is standard technician workflow.
FAQ
Is iBSS the same as iBoot?
No.
iBSS is temporary.
iBoot is the main bootloader.
Does iBEC flash NAND?
Yes.
It controls the restore process.
Can iBEC be patched?
Yes, on exploitable devices.
Does checkm8 patch iBEC?
Usually yes.
For custom boot chains.